

For years I have grown veges with varying degrees of success under the Queensland sun. I plant seedlings in the full sun as the instructions direct and hey! Presto - That afternoon, they die.
I plant them in the shade and they struggle and wither about and finally curl up their leaves and die. Occasionally I get a lettuce or tomato to maturity, but only occasionally.
I have no trouble growing banana's or Paw Paws. I have trouble harvesting a whole ripe one due to the abundance of cute furry hungry possums in our area. I can even grow Brazilian cherries (very tart- no one eats 'em) and have a cocoa tree that will grow me chocolate pods in about 30 years or so - but its growing really well in the meantime! Its just the veges I have problems with.
One day browsing in the library I came across two books about growing micro greens
How to grow Microgreens - natures own super food by Fionna Hill
Microgreens - A guide to growing nutrient packed greens by Eric Franks and Jasmin Richardson.
I headed home with them - and a whole new growing world was opened up to me!
Fionna's book is good for the home grower and Eric and Jasmin's for the more serious interest or bulk production. Both are great. These seem to be the only books on the subject - not only in the world, but on e-bay too!
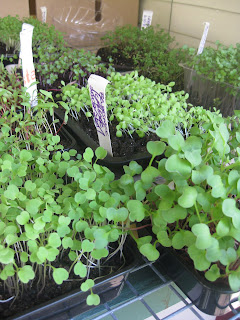
I simply sprinkled seeds on a shallow dish filled with basic potting mix, patted them down, sprayed them with water and waited for them to sprout. Its important to keep the water up to them. I keep mine on the bench in the kitchen where I can keep and eye on them until they show some green seed leaves and then pop them outside so they can start converting sunlight to sugar.
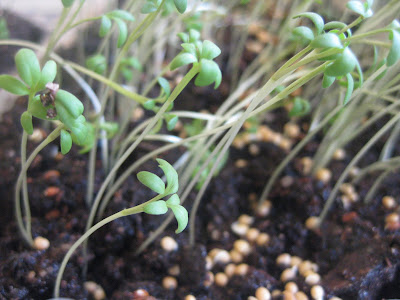


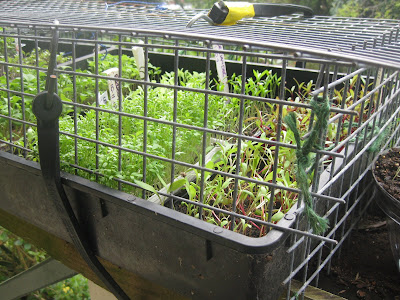
When they grow their first true leaves, you can start to harvest them and munch 'em up!!! I started growing them in the kitchen but they needed more light, so I moved them out onto the balcony. That was cool but after a while it got a bit tiresome bring in so many containers each night and putting them back out in the morning so that marauding vermin didn't munch on them in the night. So I built mine a cage.


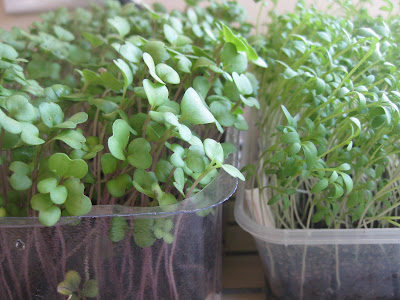
I have found that 16 takeaway containers keeps the two of us in microgreens constantly. I buy the seeds from Bunnings, Masters and Crazy Clarke's for around $1.50 a packet. Depending on the seed quantity, I usually get 2 containers out of a packet. Some really fine and cheap ones like cress, you might get as many as six containers out of. Others like the beets, I only get one. I like to get colourful ones - just cause they are fun to watch growing.
I spend about 15 minutes a week potting up new seeds and compost the old seedling potting mix as you can't grow a second crop in the same container. I don't know why it doesn't work - but it doesn't. It doesn't matter if the seedlings get to big cause you don't eat them that week for some reason - they will just keep growing and taste just as good when you get to them.
I use a spray bottle to water mine with. That way I don't drown them. With the harsh Queensland sun that my microgreens get for about 3 hours a day, I don't put holes in the bottom of my containers as advised in both books. They dry out and die too quickly. With a bit of water in the bottom, they seem to be able to cope with the sun better. And they are better with more seed rather than less. I suspect they protect each other from drying out as their little leaves shade the soil.
Score card:
Green-ness: 5/5 Growing and eating your own food is just about the greenest thing you can do!
Frugal-ness: 5/5 Seeds are cheaper than than the plants they become and if you use recyled pots, its almost free!
Time cost: about 15 minutes per week.
Skill level: Super easy! Give it a go!
Fun -ness: Awesome fun. Watching and waiting for the seedlings to grow big enought to eat is wonderful fun for the whole family!
I plant them in the shade and they struggle and wither about and finally curl up their leaves and die. Occasionally I get a lettuce or tomato to maturity, but only occasionally.
I have no trouble growing banana's or Paw Paws. I have trouble harvesting a whole ripe one due to the abundance of cute furry hungry possums in our area. I can even grow Brazilian cherries (very tart- no one eats 'em) and have a cocoa tree that will grow me chocolate pods in about 30 years or so - but its growing really well in the meantime! Its just the veges I have problems with.
One day browsing in the library I came across two books about growing micro greens
How to grow Microgreens - natures own super food by Fionna Hill
Microgreens - A guide to growing nutrient packed greens by Eric Franks and Jasmin Richardson.
I headed home with them - and a whole new growing world was opened up to me!
Fionna's book is good for the home grower and Eric and Jasmin's for the more serious interest or bulk production. Both are great. These seem to be the only books on the subject - not only in the world, but on e-bay too!
I simply sprinkled seeds on a shallow dish filled with basic potting mix, patted them down, sprayed them with water and waited for them to sprout. Its important to keep the water up to them. I keep mine on the bench in the kitchen where I can keep and eye on them until they show some green seed leaves and then pop them outside so they can start converting sunlight to sugar.


When they grow their first true leaves, you can start to harvest them and munch 'em up!!! I started growing them in the kitchen but they needed more light, so I moved them out onto the balcony. That was cool but after a while it got a bit tiresome bring in so many containers each night and putting them back out in the morning so that marauding vermin didn't munch on them in the night. So I built mine a cage.

I use these as greens in salads - Because I use such small containers - they are those takeaway Chinese ones or ones I recycle from meat packaging (thoroughly washed of course) They are easy to harvest. I simply tip the container on an angle and then cut the seedlings off with a pair of scissors. The seedlings more or less tumble into the container. I rinse them and pick them over to make sure I have got all the seed hulls. Not much fun if you munch on one!

I have found that 16 takeaway containers keeps the two of us in microgreens constantly. I buy the seeds from Bunnings, Masters and Crazy Clarke's for around $1.50 a packet. Depending on the seed quantity, I usually get 2 containers out of a packet. Some really fine and cheap ones like cress, you might get as many as six containers out of. Others like the beets, I only get one. I like to get colourful ones - just cause they are fun to watch growing.
I spend about 15 minutes a week potting up new seeds and compost the old seedling potting mix as you can't grow a second crop in the same container. I don't know why it doesn't work - but it doesn't. It doesn't matter if the seedlings get to big cause you don't eat them that week for some reason - they will just keep growing and taste just as good when you get to them.
I use a spray bottle to water mine with. That way I don't drown them. With the harsh Queensland sun that my microgreens get for about 3 hours a day, I don't put holes in the bottom of my containers as advised in both books. They dry out and die too quickly. With a bit of water in the bottom, they seem to be able to cope with the sun better. And they are better with more seed rather than less. I suspect they protect each other from drying out as their little leaves shade the soil.
Score card:
Green-ness: 5/5 Growing and eating your own food is just about the greenest thing you can do!
Frugal-ness: 5/5 Seeds are cheaper than than the plants they become and if you use recyled pots, its almost free!
Time cost: about 15 minutes per week.
Skill level: Super easy! Give it a go!
Fun -ness: Awesome fun. Watching and waiting for the seedlings to grow big enought to eat is wonderful fun for the whole family!
Comments